Two Turns of the First Vignette
The Hevelien Expansion Zone is a medium to tell stories. Fleet Command Hevelius, our starship combat ruleset, puts you in the chair of a fleet commander fighting battles to give your faction (we call them Sponsor Powers) an edge. It has pages dedicated to who is in the Expansion Zone, what they are fighting for, who they tend to like and dislike… and having every single publication follow that format can be a lot when you’re itching to get straight into the action.
With the Vignette system, we wanted to explore stories on a much smaller scale. What if we zoomed in on one group within one region of our setting? What could we show you about the inner turmoil of one faction, and how could we use that as a launchpad for you to tell your own stories on the tabletop?
In The Maganec Incident, the Empire of the Sevens’ Expansion Zone holdings are on the brink of civil war. Power has changed too many times in too short a timespan for the loyalties of its pseudo-Imperial citizens to have shifted with it. You - taking on the role of a mercenary commander hired by one side of the conflict - must end this civil war before it begins.
What follows is the first two turns of our own journey through the module. While we are hard at work developing plastic miniatures for use with Fleet Command Hevelius, the models showcased below are used with permission from TTCombat’s Dropfleet Commander range.
Fleet Rosters
The Loyalists
Fleet Commander: “Fights Like”* Star General Irwin Drake (Command Rating Bonus)
2x Seeker-class Corvettes with mission packages to contest objectives
2x Acadia-class Bulk Freighters, modified to be troop transports with noncombatant beacons
2x Martlet-class Battle Cruisers, with veteran captains
* “Fights Like” meaning it shares a stat block with a faction-appropriate special character, without actually being that special character
The Separatists
Fleet Commander: “Fights Like” Commodore Marina Surash (Improved Attack Evasion)
4x Estrix-class Corvettes with mission packages to contest objectives
2x Garuda-class Frigates, with veteran captains and upgraded defensive systems
1x Acadia-class Bulk Freighter, with no modifications or shields
Turn 0: Setup
The mission area is divided into quadrants, each with a Garrison objective in the center. The Separatists are trying to land troops on a series of mining stations that the Loyalists would really prefer to keep. Demilitarized Zones, which represent civilian traffic and other noncombatant assets, make it harder for both sides to maneuver - neither wants to win the battle only to lose the war because of a diplomatic incident.
Mission 1 starts with the Loyalists deploying first. The Loyalist Fleet Commander, rumored to Fight Like Star General Irwin Drake (famed for his role leading the fleets of the Free League of Bospherine) spreads their ships around the field to best contest all four Objectives.
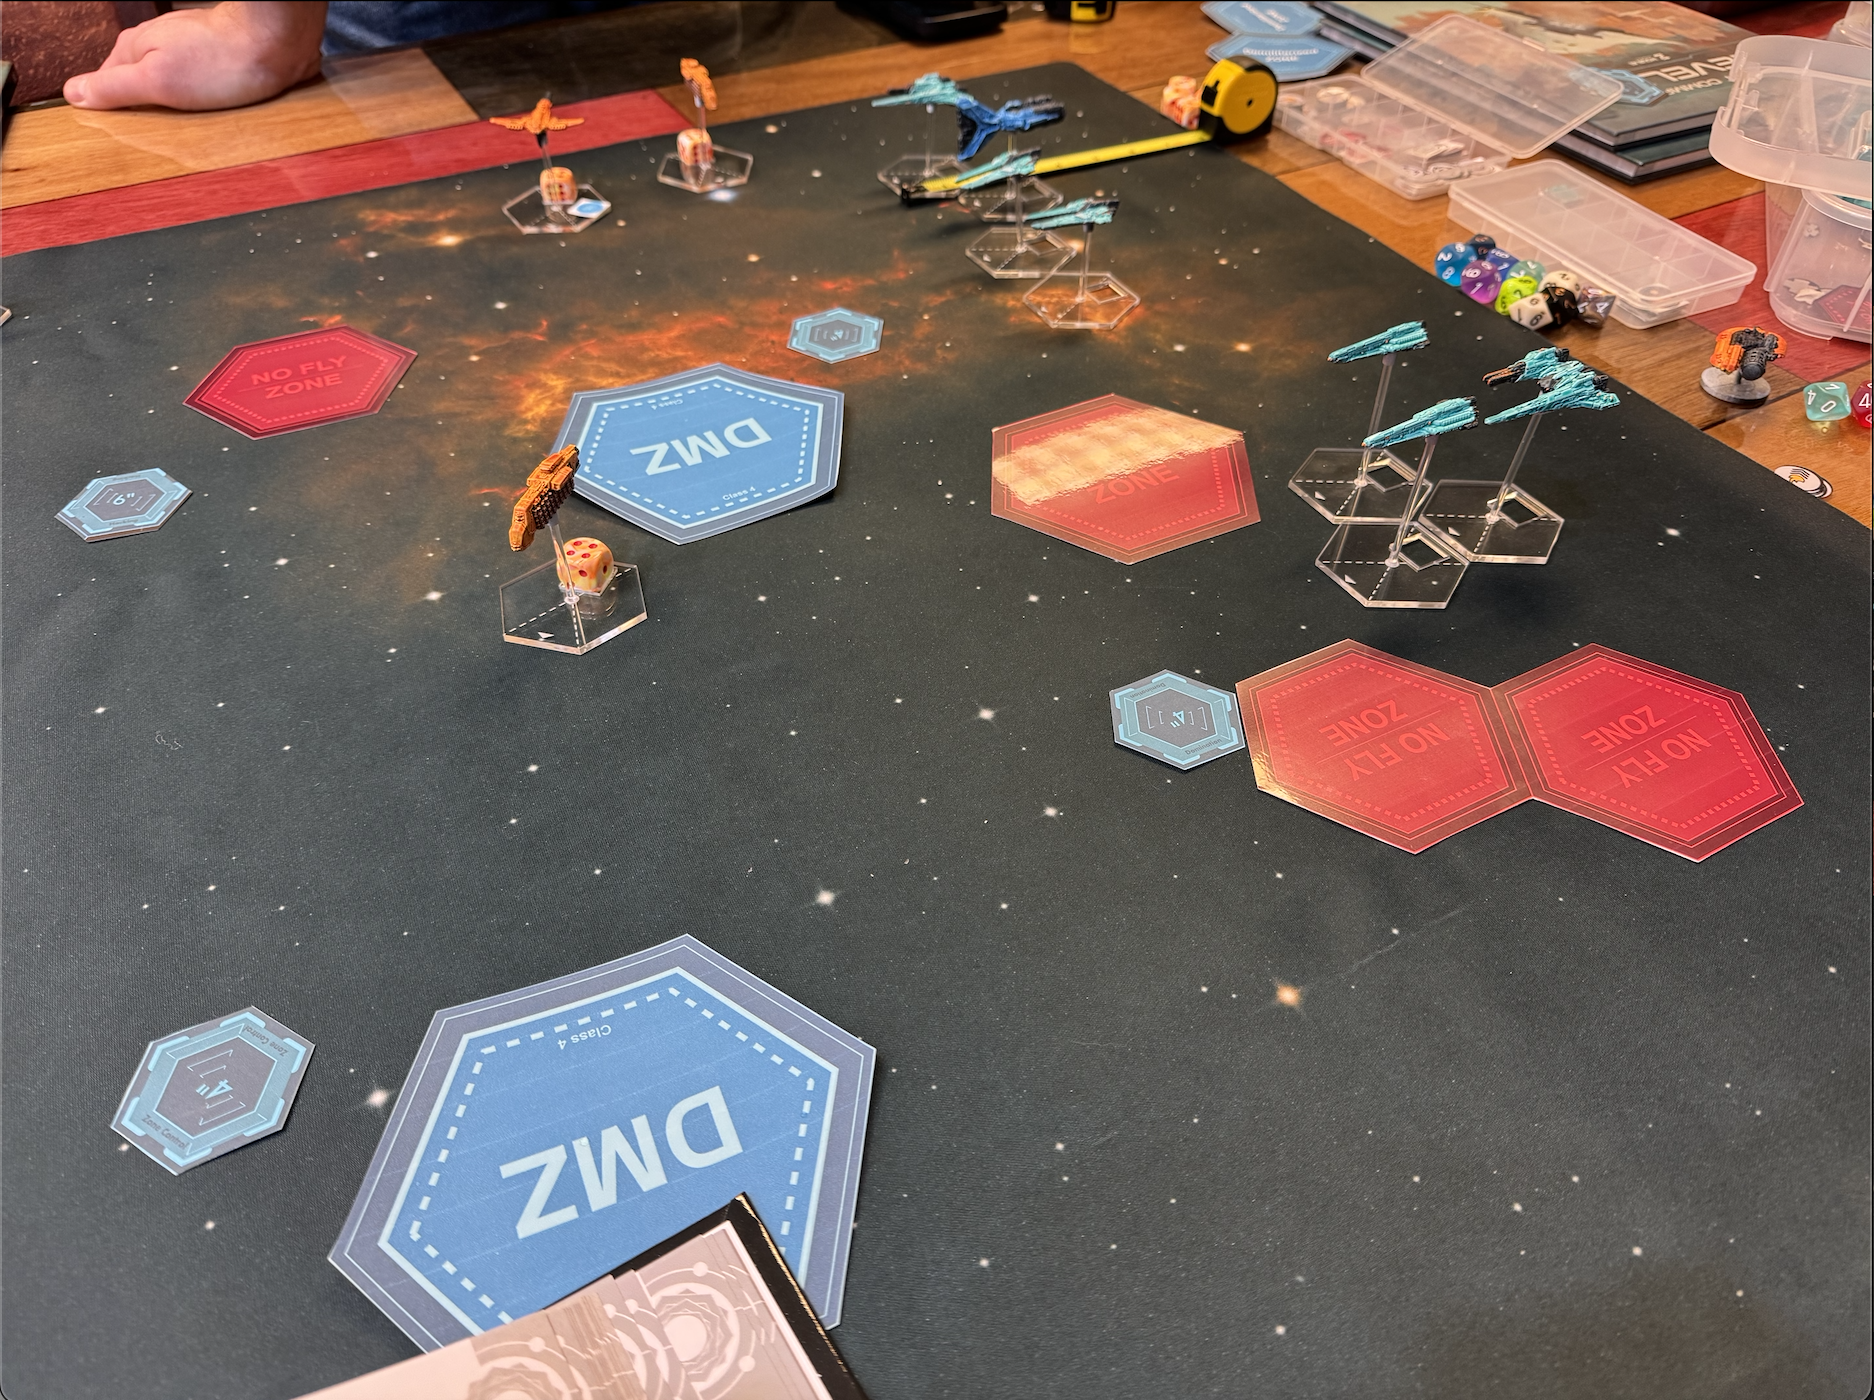
The Loyalists (Orange) deploy a Seeker and two Acadias to the eastern sectors; the Separatists (Blue) subsequently deploy to the east in full force.
In contrast, the Separatist Fleet Commander must deploy from a single board edge. When the choice of board edge is between taking on two noncombatant ships with their Corvette escort; or trying to take on two imperial Battle Cruisers on Turn 1, it’s not really a choice at all.
Rumored to Fight Like Commodore Marina Surash (whose innovative tactics during the LOTUS-Argevite War earned her a promotion to lead the Argevites’ most prestigious unit), the Separatist Fleet Commander hopes to blitz two objectives right at the start of the match before turning to a crucial third objective in a make-or-break stand for victory points.
Turn 1
The Loyalist Fleet Commander goes first. Surprising neither side, their cruisers burn engines to reach the center of the board. They look like they are out of position at the beginning of the game, but in reality they are ensuring they can enter the fight on their own terms.
In just the space of a single movement phase, the board is divided between east and west. The Loyalists have secured the western objectives through the presence of cruisers alone, allowing a troop transport and a Seeker fielding strike teams to secure two of four mines uncontested.
The Loylists (Orange) secure the western mines. The Separatists (Blue) prepare to take on a cruiser in the southeast, while both sides prepare for a fight in the northeast.
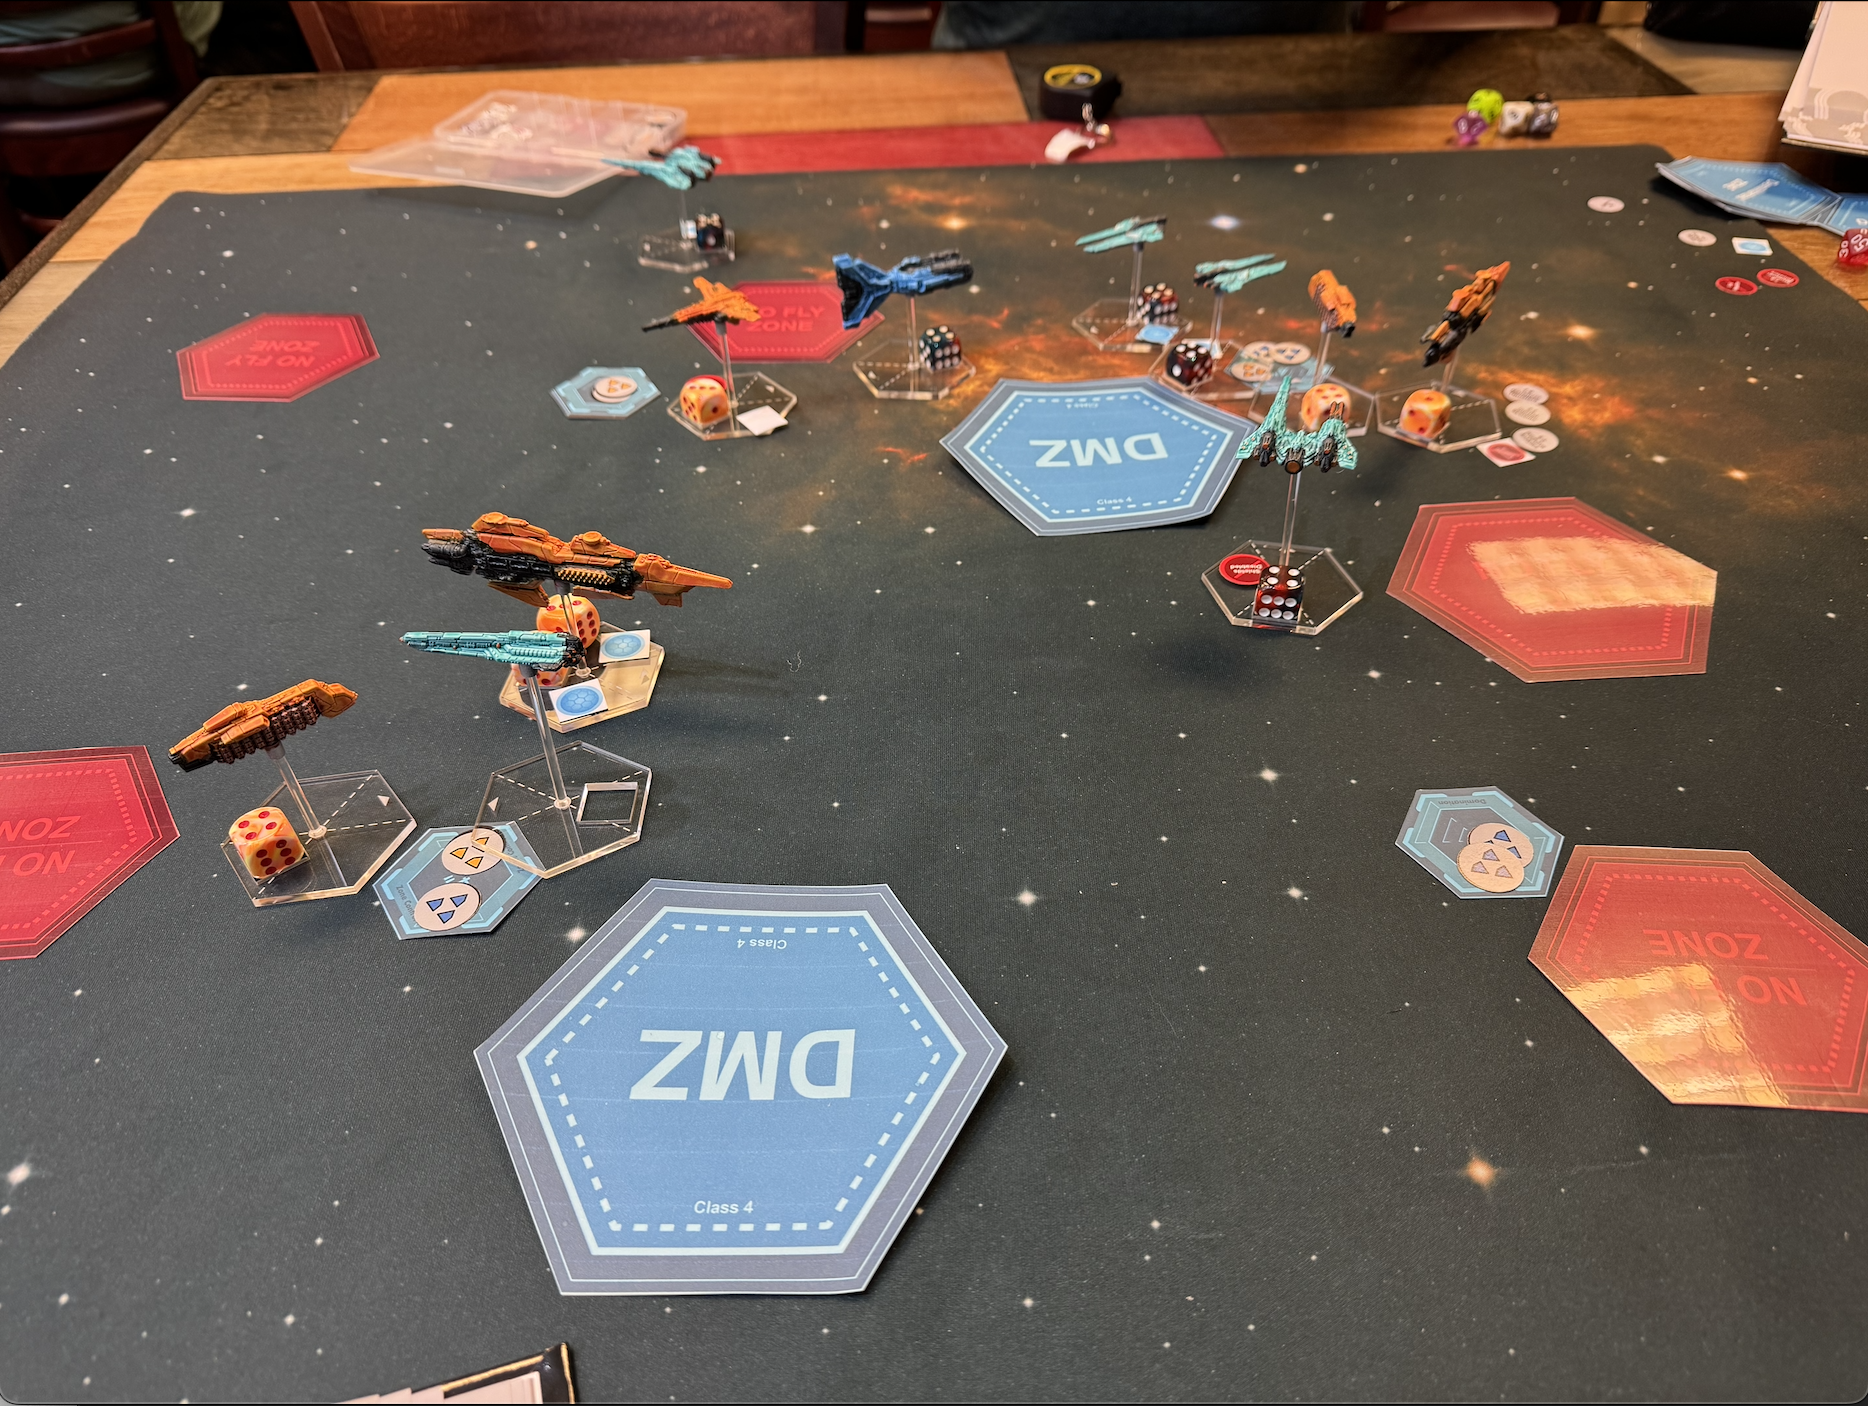
Two Loyalist cruisers concentrate their fire on a troop-carrying Estrix Corvette to open the shooting phase. Firing from several light-seconds away, the corvette’s maneuverability and shields can give any targeting system a run for their money. Yet the Martlet is among the most lethal platforms in the Hevelien Expansion Zone at this stage of the war: three independent weapons systems apiece hurl inert kinetic and plasma rounds at the Estrix’s fragile hull. They overwhelm the Estrix’s shields, inflicting devastating critical hits as they force its hull rating down to 0. The Estrix will not survive this opening onslaught.
In response, the Separatists in the southeast concentrate their fire on the closest cruiser. The Martlet’s twin shield arrays can absorb a lot of firepower on their own, but combined the three ships are practically a cruiser in their own right. They disable the Martlet’s shields, inflicting critical hits along the way, with the Garuda frigate’s own plasma arrays being crucial in eroding the Martlet’s hull.
To the northeast, two Separatist Estrix Corvettes exchange fire with the Loyalist Seeker. While their weapons are small, so are their respective targets. The Loyalist Seeker will become another Turn 1 casualty.
In contesting the Garrison Objectives, all ships with an objectives module are able to deploy forces this turn - even the destroyed ones. A ship that runs out of Hull Points in the Shooting Phase remains on the board until the end of the turn.
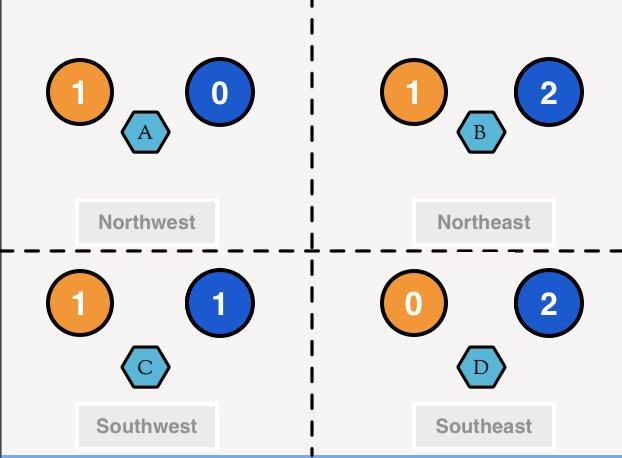
There is one catch: A Garrison Objective special rule is that having a ship’s base overlap the objective lets you take an opponent’s troop marker off it. In the northeast, this lets both Separatist and Loyalist add two and remove one.
The state of each objective at the end of Turn 1. Loyalist points are in orange, while Separatist points are in blue. At the end of the match, whichever side has the most points on an objective wins that objective; and each objective is worth 1 Victory Point.
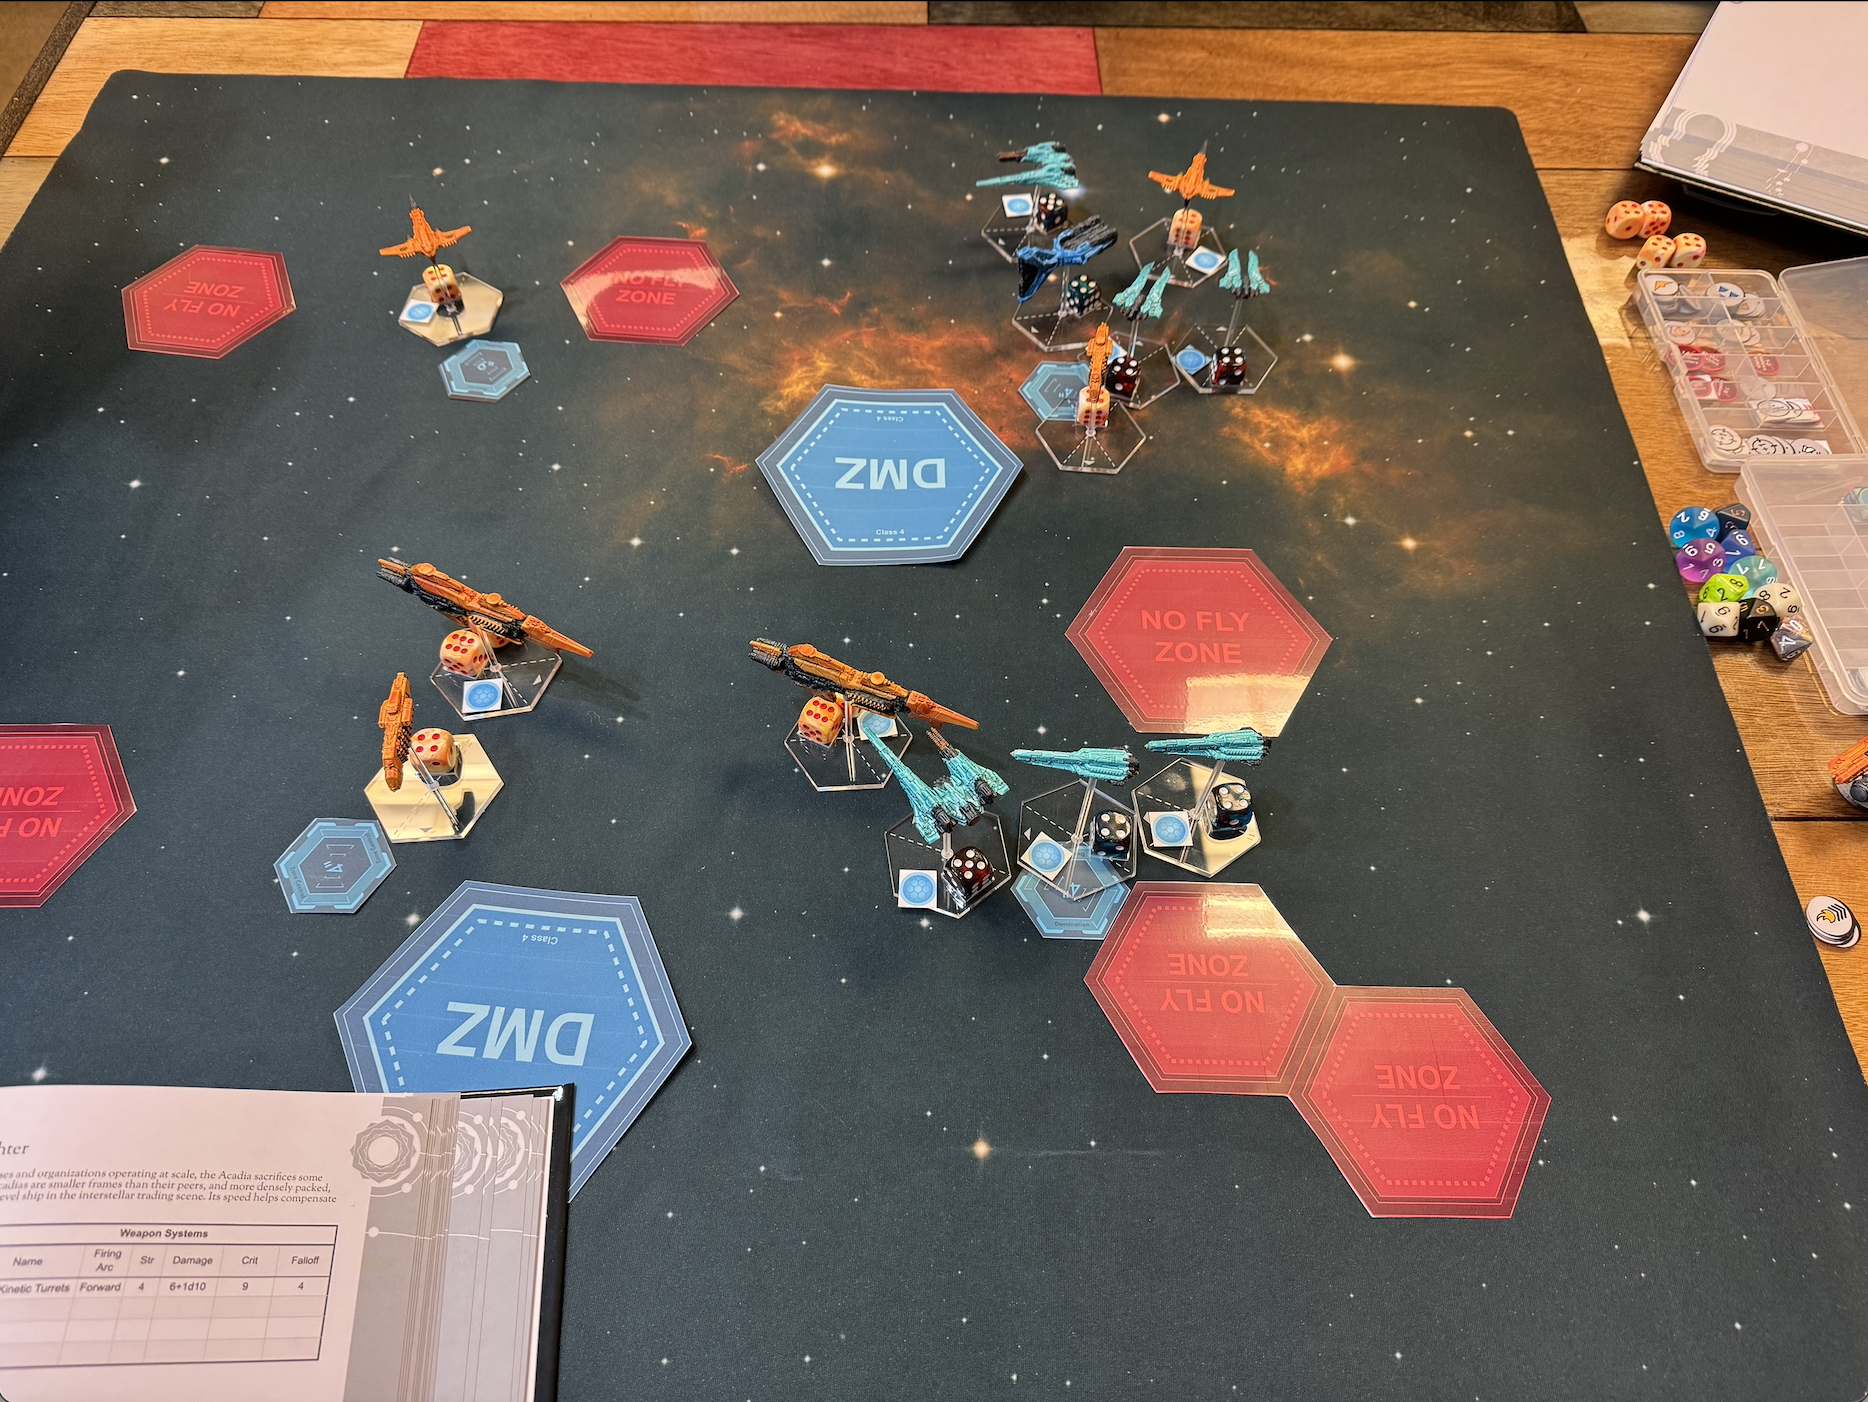
Turn 2
The opening moves saw both the Separatist and Loyalist Fleet Commanders scoping out their match-long strategies. In Turn 2, they start to execute them. The Separatists disperse their southeastern forces to the north and west. The Loyalists try to close ranks around the remaining three mines.
In the southwest, the Separatists send an Estrix on a one-way trip to keep the Loyalists occupied there just a little longer. In the northwest, the Separatists dispatch a Garuda Frigate and the Acadia Bulk Freighter to take out a troop-carrying Seeker.
The Loyalists (Orange) secure their holdings while the Separatists (Blue) try to find a weak point.
The northeast is where things get interesting. With the wounded Loyalist Martlet-class Battle Cruiser reinforcing the mine, the wise thing to do would be for the Separatists to try their luck elsewhere. Instead, the Separatists’ troop carrying corvettes maneuver to put the Loyalist troop transport between them and the cruiser. In the meantime, the second Separatist Garuda pursues the wounded Martlet in the hopes that its plasma arrays can bring the larger ship down for good.
In executing this maneuver, the Separatists have exploited the Acadia’s noncombatant beacon. This upgrade forces both players to treat its base like a Demilitarized Zone (terrain). Mechanically, neither side can move or shoot through the vessel (in story terms, consider that if the Loyalists shot around their own ship to hit the Separatists, the Separatists could justifiably fire back and “accidentally” hit the noncombatant!)
With so many ships out of firing arc, the Turn 2 shooting phase is relatively short. The Loyalist Martlet and its veteran captain destroy the Separatist Estrix in the southeast, its weapon systems overwhelming the smaller ship’s meager defenses.
To the north, the Separatist Garuda fires at the second Martlet’s exposed engine block, knocking the cruiser down to a single Hull Point. The Separatist Acadia and the Loyalist Seeker trade shots, with both hurting from the exchange. The Acadia - brought along to pad the roster - even manages to score a critical hit! The Seeker, for its part, is able to exploit the Demilitarized Zone to its north and prevent a lethal volley from the approaching Separatist frigate.
And in the northwest, the Separatist maneuver works: the Martlet is not able to target the corvettes, having been fully blocked by its own wingman.
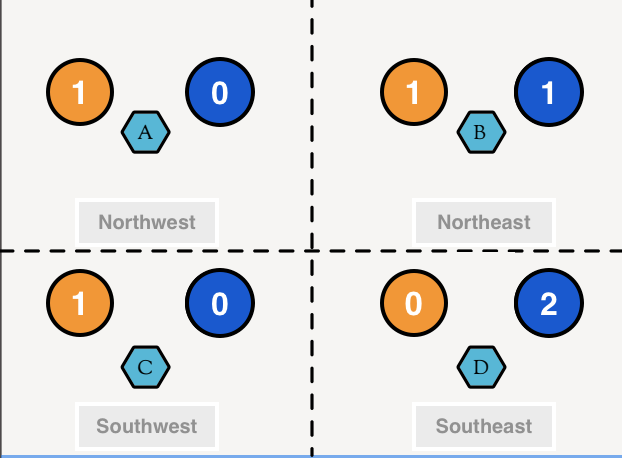
In the northwest and southeast, the Loyalists and Separatist garrisons respectively have a reprieve in the fighting. In the southwest, heavy fighting sees each side add one troop squadron each, with the Loyalists removing one squadron (due to only the Separatists overlapping the objective).
Finally, in the northeast, both sides again add and remove one squadron each. However, with the Separatists having one more mission-oriented ship on station, the Separatists add an additional squadron to the fighting.
The state of each objective at the end of Turn 2. Loyalist points are in orange, while Separatist points are in blue.
What Happens Next?
The Fleet Commanders have two more turns to win or lose the opening battle of the Maganec Incident - but how the battle ends, and how the campaign evolves, is best seen on your own tabletop!
The Maganec Incident (Fleet Command Hevelius Vignette #1) is now available on Wargame Vault
This 2-player campaign can also be used by event organizers to run multiple tables. Its 1,500 point missions can be played in 1-1.5 hours each. The narrative mission pack includes:
A short primer on the civil war threatening to spill over into an already tenuous region of space
A five-mission, branching narrative that evolves based on who is winning at what stage of the campaign
A short introduction for each of the eight total missions in the campaign, letting you get straight to battle while still knowing what you are fighting for
Story hooks for bringing in any of the six factions in Fleet Command Hevelius onto the tabletop